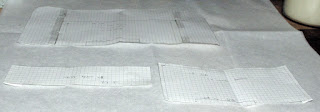
It's a fairly simple design. You'll need two measurements:
1. size of the targeted napkin (usually a square with width measurement only)
2. basket height
To make your pattern:
The pattern will consist of three pieces.
PIECE A:
The first piece represents your overall basket.
1. draw on a piece of math paper the napkin
2. draw 1cm (2/5") all around
3. draw a 4 rectangles representing the height; extend the rectangles to the corners (this will result in 4 squares on the corners)
4. draw the seam allowance all around the resulting rectangle. I used about 1cm (2/5")
5. using a glass or other round tool, round off the 4 corners
PIECE B:
The second piece represents the napkin. It will be a square with the side of the width measured above (width of the napkin)
PIECE C:
The third piece represents the sides. It will be a rectangle of width of the napkin x height of the basket.
 |
| I made my 1st and 2nd pieces on the fold |
Cutting list:
2x PIECE A, main fabric
2x PIECE A, interfacing
1x PIECE B, something stiff (batting, felt)
4x PIECE C, something stiff (batting, felt)
To make the basket:
First, arrange the stiff pieces on the wrong side of one of the the main fabric pieces according to the pattern.
Then, add the interfacing and press according to the manufacturer's instructions:
Interface the second main fabric piece as well.
Take the two interfaced pieces of fabric and, right side together, start stitching on the seam allowance. Make sure to leave a bit unstitched so you can turn over later.
Once you're done, notch the corners:
Then turn through the opening you left. After turning, make sure to press.
Once you've done with the turning and pressing, topstitch around the edges:
At this point, the corners should look like this put against a light:
What you want to do is bring one edge against the one next to it:
And stitch next to the stiff fabric. Mare sure this stitching is done at a 90 degree angle. You can use your fingers to feel the edge:
Once you've done this for all 4 corners, you will need to edge stitch along the bottom sides. This is done to ensure the basket will stand properly on an even surface. This is how you need to position the basket sides. Make sure the angles are all at 90 degrees:
You're done! My finished basket has a festive spirit, it's all red!


What a good idea and if it was filled with napkins it would make the perfect gift. Thanks for the idea.
ReplyDeleteGreat idea! The tutorial is great, will I remember this for next year (too late to start now...)
ReplyDelete