Friday 31 December 2010

NEW YEAR, NEW GIVEAWAY!

HAPPY NEW YEAR fellow Crafty Christmas Clubbers!  To celebrate, I'm holding a giveaway over at my blog.  If you fancy winning this lovely book....

.... or these gorgeous Liberty fat quarters...
... then head on over there for further details.  Jane x

Tuesday 28 December 2010

Post Christmas Post

Hi, everyone! It's Jaimielee from hippopotamuslee.blogspot.com. I had such a great time reading the lovely posts you all wrote here. It was an awesome source of inspiration! I definitely didn't get everything done that I planned (what else is new?), but my holiday was great. I hope yours was too! I don't want to flood this page with my Christmas Photo Explosion! but be sure to check it out over at my blog :)


My 1st tree with tons o' gifts!!

Sunday 26 December 2010

Pressies for the in-laws


Now that Christmas is over I can finally share the last presents with you. I would also like to take this opportunity to invite you all over to Grey Duckling to take part in my first ever giveaway. In the autumn I made a few bobbin lace flower brooches and I am giving one of them away as an extra New Years present to one lucky person. You just have to comment on the post on Grey Duckling to take part in the giveaway.

I hope you all had a great Christmas and I wish you all a crafty New Year.
Eddie


Bunch of knitted flowers for my sister-in-law made using Ingrid's recipe for knitted flowers on Historic Crafts.


Novel bag for my sister-in-law using this tutorial from Grey Duckling that I adapted from the book 'playing with books'!


Decoupaged drawing onto the bottom of a bowl for my sister-in-law


Basketweave scarf for my father-in-law using this pattern that I talked about on 'Roued is...'.


Another decoupage bowl!


Mug cozy for my mother-in-law made with the Dixie Norton's pattern on Ravelry.


Garden markers for my mother-in-law. I have posted a tutorial on Grey Duckling on how to make these.

Update and more gifts

I'm a bit late but let me wish you a merry Christmas fellow crafters! So I gave my mum her dress and skirt, she loved them (I haven't taken pics yet but I will try to soon!) and even wore the dress today. My cousin also loved her gifts, especially the coral shorts and my step mum loved her cushions, phew^^! I've finished the presents for my friend Marie, she's fond of Asia so I chose a Chinese inspired print for them. First a pouch lined with denim:


Inside a bow hairtie, a chouchou and a bracelet:


I've added charms on the bracelet:

Saturday 25 December 2010

The Christmas wrap-up


Hi everyone

I just wanted to say, quickly, that I hope you had a fantastic Christmas day and that you are recovering from the compulsory over-eating and drinking that often goes along with it.

I did get my Christmas dress finished in time - and I've got to say that I'm pretty happy with it.

Thanks Tilly for coordinating this great blog and thanks to everyone who inspired me with their handmade gift ideas. Count me in for next year!

Stitchybritt

Friday 24 December 2010

Lebkuchen


Oops sorry, that was a premature goodbye - allow me one more post! Just made some lebkuchen, using this recipe. Great prezzies for random family friends that I'll be seeing over the next couple of days.

So long!

Fun with felt!

I had lots of fun with felt this year when it came to wrapping prezzies...


... cutting out felt xmas trees and snowmen for the gift tags...


... using strips of felt as an alternative to ribbon...


... even sticking felt hearts and recipient names to the wrapping paper!

This will be my last post before Christmas so I just wanted to say a BIG THANK YOU to everyone who has contributed to Crafty Christmas Club over the last few weeks and made it such a great resource for festive giving inspiration. I never thought it would get so many members so quickly and lots of people have told me they're amazed at how many posts are going up each day. Well done everyone! And until next year!

Love from Tilly x

Thursday 23 December 2010

Beaded Stitch Markers (earrings?)


This is one of those things I wish I could blog in my own spot, but I know I can't, because I haven't gifted them yet, so I would be spoiling the surprise, and we can't have that now, can we?

No. I think not.

I like these ones best:

Some of my knitting pals probably will want to wear these as earrings. I'm prepared with sets of ear wires for them, should they desire. I'd suggest removing the huge ring and the 2010 tag, but I'll leave the final decision up to them.

Simple to make. I used various "head pins" as a base, all with decorative heads. You just slide on beads until you like what you see. Leave at least an inch of pin to make the loop. You'll bend it over at right angles, leaving about 1/4" clearance between the top bead and the bend. Then take round-nosed pliers, or other small rounded item, like a knitting needle, and wrap the pin end around in a full circle. Keeping the pliers (or knitting needle) in the loop, now wrap the remaining end around the bit of pin just above the beads. Trim if necessary, and give it a good pinch with the pliers to make sure the end stays smoothly in place. Remove the pliers and tweak your loop so it's upright, if it needs it. Lastly, put in a split ring (I use split rings instead of jump rings because jump rings can pull apart) through your loop. I had a hard time finding split rings larger than about 9mm, which works for average knitting needles, but can't handle size 10's or larger. I finally found larger ones at Hobby Lobby. These are 16mm, and should glide nicely over all but those comical massive-huge needles.

The Curvy Clutch goes glam!

Hello everyone! I'm a bit of a late arrival to posting on this blog, but better late than never (and it's still before Christmas!). My name is Suzie and I blog over at Su Sews So-So, do pop over sometime and say hi - I love hearing from everyone.

I had actually decided not to make anything handmade as presents this Christmas after a rather upsetting experience of spending lots of time and money on a present for a friend that was quite obviously not appreciated. I had blogged all about it at the time, but have since deleted the post as I didn't like having such a negative post up on my blog! Plus, I've had my faith restored in humanity (lol, a little over dramatic perhaps?!) and I decided that I would try again at giving handmade.

My group of friends opt to do Secret Santa for presents - if you haven't heard of this concept before you basically put all the names of your group in a hat and the name you pull out is who you buy a present for. You also tend to sent a limit to spend, so that everyone spends the same amount. It's a great way to save money and time and it means you are more likely to get one 'big' present that you (hopefully!) like rather than lots of little small things that might just be 'crap' (!!).

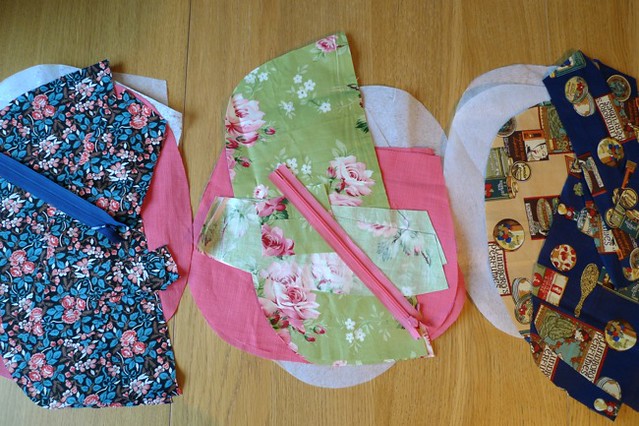
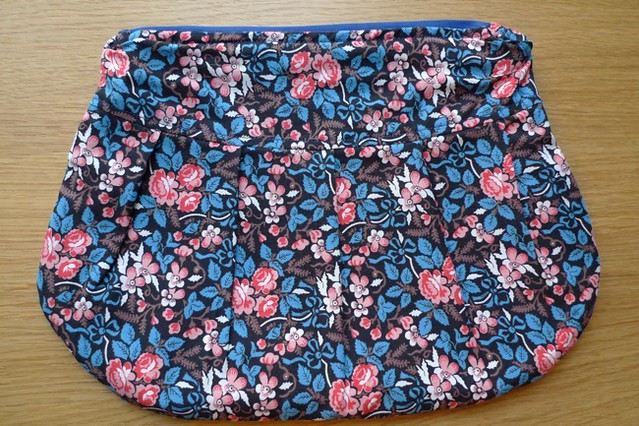
This year I got my lovely friend Meliosa (pronounced Mel-Lisa, it's Irish) and I knew she would be the perfect person to make a Curvy Clutch for. I had previously made the Curvy Clutch for myself (pattern here) out of red and black Ikea fabric and it really was quite a hit with everyone, especially her - so I thought she deserved her own version!

I found a beautiful red dupion reduced to a bargain £4 a meter so I snapped that up and paired it with a gorgeous gold print my mum had given me and made up the bag. I was very happy with the finished result, but I felt it lacked a little something. So after a scout around the shops I decided to add a flower hair-clip to the lid, and it really transforms the bag into something quite glamorous!


I took the finished bag to my mums to show her and she promptly produced a gorgeous pair of newly purchased red heels which she plans to wear out for NYE...and didn't have a bag for..... Now what on earth could she have been getting at?! So, the good daughter that I am, I suggested she keep this bag and I make another one for my friend.

So back to the sewing machine I went! To be honest, I had been having reservations about the gold lining as I remembered that Meliosa never wears gold jewellery, so it turned out for the best that I could make another one in more suitable colours. So she will be getting this:


This is a gun-metal dupion shell with a satin dupion royal purple lining. The photo's don't quite do the colours justice unfortunately.

I hope she likes it!


Thanks for letting me post here, it's been great fun seeing what everyone has been making - what a great idea Tilly! Wishing you all a very Happy Christmas and a very crafty 2011!!!

Wednesday 22 December 2010

Last Minute Stocking Stuffer

I love personalized coupon books, but have never made one! I decided I would made one for my fiance this year, filled with romatic date ideas that he can "redeem" throughout the year. I edited a bunch of wallet sized photos that we had taken throughout the year, printed them on cardstock, then "sewed" them together with some embroidery thread. I covered the sewed part with a glued on piece of card stock.

I added ideas like... "A walk along the beach," "1 Free Sleep-in," and other more... romantic suggestions that I will leave up to your imagination!
I am really happy with how it turned out. I added 10 coupons in total.
I also made my soon-to-be mother in law this fabric flower broach out of some remnants of chinese brocades. It's simply a matter of sewing together a bunch of half circles, gathering the raw edges, then finishing it off with a covered button!


I am very proud to say I have made almost all of my Christmas Gifts this year. Feel free to visit my blog to see the other gifts I've been working on.
Happy Holidays! I am loving all the ideas here!!!

Twizz the Season!

Made these up a couple nights ago. Hardly takes any time at all. You melt some chocolate (white or regular - I used the stuff they call Almond Bark, but you could use any chips or dipping chocolate), dip the licorice in it, set it on waxed paper to set up, and then throw a dozen or so into a cello bag.
The tag/topper is a half sheet of card stock (red) which I gave a cute edge to using a fancy edge rotary cutter (you could use pinking sheers, or deckle scissors, too), and then I used double stick tape to stick the white label on top of that. (Couldn't find my glue stick...) Fold the half-sheet in half over the top of the bag.
In case you can't see it here, the white label says: "Twizz" the Season to be Jolly (I can email you my word doc if you want, but it's easy enough to type up yourself.)
Stapled a couple of them, but then decided double stick tape worked well to attach the label, without sharp things to poke you, and I went with that. One strip on each side of the topper, about an inch from the fold.
On the back, I wrote a personal message and signed it.

Cute, and quick, and so very easy. Just the thing this week.

Christmas Wrapping Ideas & Quick Tutorial

As per my last post, I've been playing about with making pleated paper bands with which to embellish our gifts this year. I'm rather pleased with the result and have kept it simple by just adding a narrow ribbon and neat bow to finish.

If you like the idea, it's really easy. To make the band I measured out some guidelines on the back of a length of contrasting wrapping paper. But you can do it by eye as well. (I'm rubbish at that though!)

I spaced them about an inch apart and used the edge of my metre rule to fold them smooth along the edge. Folding one way, then the other, to create a concertina effect.

I then pressed the band under a pressing cloth using a warm, dry iron. Just to sharpen the folds really, and  keep it nice and flat.

I wrapped it pretty snug around my gift, (don't want it sliding off or moving about) trimming of the excess and securing it at the back with sticky tape.

I added a very simple bow in a contrasting colour to finish. I'm alternating the green and turquoise ribbons on different gifts to tie in with the main wrapping paper.

To make these bands for EVERY gift would be too time consuming for my liking (and for the time I have left!) so I've compromised by alternating between plain (see right) and pleated bands on different gifts.


Now I know what I'm doing, should have it all finished by tomorrow!

Tuesday 21 December 2010

Bunting - Gawd its so easy

I have some fabulous double sided applique sticky sheets.  Makes doing the letters a breeze.

Check it out !

 They are such a flexible craft.  Squares/triangles - heck I've seen all kinds.   And just find a font on the internet enlarge it - trace it - cut it out and stick it on.

Takes 45 minutes to make one like this.

If you're desperate for a last minute gift for a child aged up to about 13... I'd say this fits the bill.

Or you could do a merry christmas one, joyeux noel if you're feeling a bit arty.

Merry Christmas

Lore
x

Wrapping is underway.....

It's funny how writing about the things that you do, makes you realise "stuff" about yourself. I am pretty methodical when I approach projects. Sometimes I look at the ordered manner of things in process and think "wow, that girl has control issues!!" Then I remember that "that girl" is me,and put it down to simple efficiency!

When I'm wrapping lots at once, I  keep everything pretty uniform and identical. It's quicker that way. Much as I get a kick out of gift wrapping, I don't have the time or inclination to spend days on it! I'll wrap everything first, then embellish and label them all in one go. (I use trusty post it notes to keep track of who's gift is who's). .Here they are all stacked, labelled and ready.

Next phase will be to add tags and embellishments. I have my handmade tags all ready to go as per the tutorial I posted. I have all my ribbon ready as well. I've just bought some red matt metallic paper that I'm going to try as pleated bands wrapped around each gift. Not sure of the detail yet, or whether it will work out, but that's the plan for tomorrow. Would love to see other peoples wrapping on here!

http://portialawrie.blogspot.com/search/label/Crafty%20Christmas%20Capers

It's all done!

Hi Guys

I've not really posted here due to no time to get to the computer to sort the pics to go with the posts. I'm afraid this post is without pics as well.

However I have got everything done now. I would like to thank all of you for your inspiration. I have so many ideas for next year thanks to you all!

All in all I have completed 5 messenger bags (from this tutorial?, 1 needle roll (from this tutorial), 1 make up brush roll by adapting the above pattern, 1 small child's bag (using the pattern found here), 2 sets of wrist warmers (using the idea here), a tailors ham and pincushion, a freezer paper stencil t-shirt with the Blue Sun logo, jars of plum jam/tomato chutney/onion marmalade/courgette jam, more soap than you can shake a stick at.

Phew!

I have one last gift to go which is a knitted moose for my stepdaughter. I'm doing that now. I hope to post pics of everything over the holidays when I have a bit more time. Also I will do recipes for the jam etc too.

Scrap Buster: Gift Pockets!


Want to make something cute with those holiday fabric scraps?  Make a little gift pocket that you can hang on your tree to hold money, candy, or miniature ornaments:

These are easy, quick, and fun to make.  Get the details at Serendipity Handmade blog.

Monday 20 December 2010

More Buttercup bags!


Following the success (if I do say so myself) of the Buttercup bag I made the other day, I decided to make some more for my mum, boyfriend's mum, and friend from work. I made them production line stylee to save time and head scratching between steps.


As I discovered last time I made this, the Buttercup pattern turns out a very small handbag (10" across), so I decided to adapt it into a zippered make up bag pattern instead. I added a little extra height and flat tops to pieces A+ C, and followed Flossie Teacakes' extremely clear instructions for covering zip ends and sewing zip and fabric layers in the right configuration.


This one is made from the Liberty reproduction of an 18th century print that I bought from the V&A Quilts exhibition.


This one is a Tanya Whelan print, correctly identified by Jane as the leftover fabric from my Sencha blouse (a blouse I have never worn, BTW - the fabric is much better suited to bags!).


This one is from a tiny piece of one of my favourite fabrics ever, with a darling vintage beauty product print.


And this is what my street looked like while I was busy stitching in the warmth!

Love from Tilly x