Showing posts with label misc.. Show all posts

Wednesday, 7 December 2011

Knitted facecloths


Washcloth collage

Bonjour! Just using the guest poster pass to share these facecloths with you.

I knitted these up last weekend; each took maybe an hour and half to do, and I'm sure it would taken an experienced knitter even less time. They're perfect for using up small amounts of yarn in your stash - I used three different cotton yarns, of varying weights, and a US size 7 needle for all three. The pattern is super simple, easily done even by a novice knitter like me. I found it here on Ravelry.

The facecloths look and feel really nice. I'm going to a tie a little ribbon around them and slip them in a me-made drawstring bag, along with a bar of organic soap. Et voilà! Another present done.

Happy holiday crafting!

Tuesday, 11 October 2011

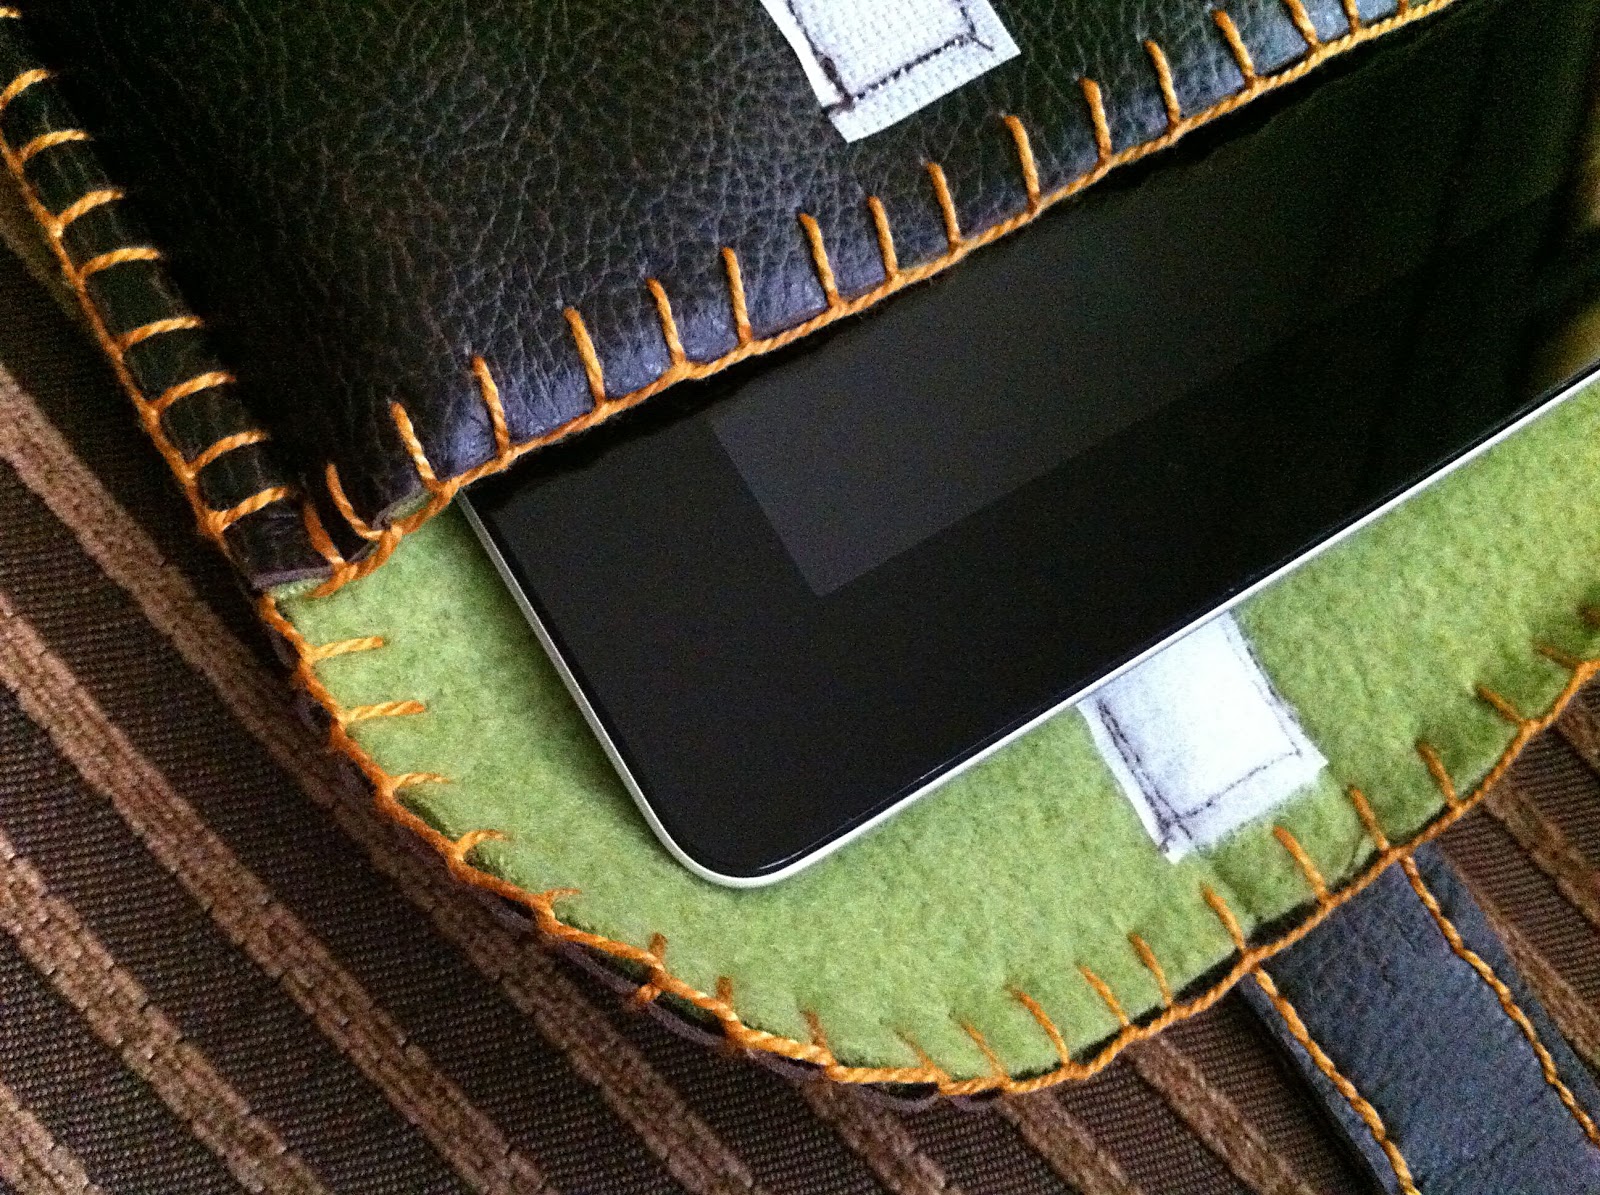
iPad Sleeve

Why is it that men are so hard to craft/sew for? Other than the occasional mending job and the annual Halloween costume, my husband gets nothing from all my crafty endeavors...except a hefty bill. Sorry Honey. Recently, however, I ran across a great tutorial for something I knew he could use, an iPad case:


The tutorial I used was actually for a laptop sleeve, but it could be easily adapted for any electronic device. If you are looking for a handmade gift for the man in your life, I highly recommend making one of these.


As far as changes to the original tutorial go, I used fleece instead of felt and did NOT adhere it using spray adhesive. Since the fleece is in one piece you can just sew it right in.  I also added a lip and decorative straps as well as some velcro for security. I knew I'd be likely to pick it up without thinking and watch in horror as the iPad slid right out. This commercial just makes me cringe.


If you are curious about the dimensions, these fit both the iPad One and Two:
  • Main body piece cut from vinyl and fleece - 11" by 18.5"
  • Straps - 1" by 8"
  • Circles - traced around a milk jug lid!
Helpful Construction Hints:
  1. After cutting out the Main Body Pieces, place the fleece on top of the vinyl. Next, fold the bottom up to 2.5" below the top of the rectangle. (The 2.5" forms the lip.) You will notice when you do this that the inside fleece will squeeze out past the vinyl a quarter of an inch or so as it becomes sandwiched inside the vinyl. No big deal, just trim it down again.
  2. Then, stitch the sides together 1/4" from the edge. A Teflon sewing foot will help or you can try using masking tape as Sweet Verbena did in her tutorial. (I used the tape method, and she's right, masking tape glides smoother. Painter's tape is also nice because it has less tack, but you can make regular tape less tacky by sticking it first to your shirt and then to the vinyl. I learned that "less tack is more" lesson the hard way and lost a bit of the top layer of my cheap costume pleather when I took the tape off.)
  3. Fold the top lip down, trim the fleece, and trace around a circular object to create rounded corners, if desired.
  4. Do decorative stitching around the edges. If you have trouble pulling your needle through, cut a small piece of vinyl and fold it around your needle to act as a gripper. (BTW, I used cording instead of embroidery floss. It's right next to the floss in the embroidery section of your craft store.)
  5. Add straps, if desired.

Friday, 17 December 2010

Homemade Salt Dough Decorations (inc Tutorial)

I wanted to have a go at these last year but time ran away with me! It's such a traditional craft that puts me in mind of the autumn harvest festivals at church when I was little. But I think salt dough lends itself to all sorts of things. (Loads more info here) It's kind of like a store cupboard Fimo!

For the Salt Dough You'll Need: 2 cups of Plain Flour, 1 cup of Table Salt, 1 cup Water (cool but not cold). Mixing bowl, rolling pin, cookie cutters,  palette knife, baking tray, greaseproof paper, cooling rack.
You can mix up any amount of dough you like as long as you stick to this ratio. 2 parts flour to 1 part each of salt and water.

Method: Mix the flour and salt in a bowl. Make a well in the centre and pour in a little of the water and mix. Keep adding the water a little at a time, (You may not need all of the water) & mix until it starts to form a dough. Then squeeze, knead & roll in your hands until it's a smooth, pliable ball of dough.

Lightly flour your work surface and rolling pin and roll out the dough to about 50mm thickness. Cut out shapes using cookie cutters, or freehand if you're a bit more skilled than I am. I left the surface of my shapes plain as I'm going to paint them. But I guess at this stage you could carefully etch patterns or designs into the surface.

Carefully lift your shapes, using a palette knife, onto a baking sheet covered in greaseproof paper. (A couple of my stars got stuck because I didn't flour my work surface properly). Punch out holes for hanging ribbons. (I used a sturdy drinking straw for this)

Bake in the oven for an hour on a low heat (say 60C) turning them over half way through. Then turn them out onto a wire rack and leave until completely cool.  Leave for another 24 hrs before painting or varnishing, which hopefully we shall be doing this weekend....

Tuesday, 14 December 2010

beaded bookmarks

I'm excited I get to show these off here, because it is super hard not to blog about them, but we aren't having our Christmas party until Thursday, so I can't blog it at "home", or I'll spoil the surprise!
Made these for my book club friends. I got the base bookmark (about $1/each) from Oriental Trading. Also the 2010 charm (36 for $5.99) you see at the top. Beads from my collection/hoard.
Super easy to string them on flexible wire, and crimp the ends back on themselves - hardly any effort at all. But it did take me a couple hours to design and make all 12.
(I provided the links for the supplies I used here in the US, but I don't know what all of you over-the-pond have access to? Hopefully you can find something similar closer to home.)
Happy Crafting!

Friday, 10 December 2010

Screenprinted Seed Bags

I mentioned in an earlier post that my theme for Christmas gifts this year (for my family) is Garden. I find it easier to buy gifts when shopping from a theme, as it narrows down your search rather than having an overwhelming amount of choices. In past years I have themed my gift shopping 'food', 'books' and a whole range of other things.

As part of my gift for a few people I am giving some packets of organic and heirloom seeds. I thought I would make some cute seed bags to give them in.


I started by sketching some simple fruit designs that will be screenprinted onto simple calico drawstring bags (feel free to copy these designs - they are pretty basic to draw).


I then transferred the designs onto screenprinting paper, and cut them out. Because I wanted to print the main part of the fruit in red, and the tops in green, I covered the cut out part of the tops in sticky tape so that I could start with the red fabric paint.


Then I screenprinted the designs onto the cut out (but not yet sewn) calico bags. Do remember to put a sheet of paper underneath your layer of fabric, because I forgot on my first one and the fabric paint bled through underneath :(

I screenprinted the cheaters way (i.e. with a paint brush, rather than a squeegie), I find this easier for small prints. I let the red paint dry, then untaped the tops and taped up the red part of the fruits, and continued to screenprint the green sections.


From here on in it was all pretty easy - stitch up the sides, then fold down the tops twice (towards you, with the right side facing you) and stitch, leaving a little space to thread some ribbon.


Almost done! Now just to finish off the ends and thread through some red ribbon...


et voila! Some cute bags to keep your seeds in!

Only a fortnight until Christmas now... can Stitchybritt get all the gifts (some I haven't started making) finished and wrapped by Christmas day?

Wednesday, 1 December 2010

Vintage Teacup Candles

The other day I thought I'd have a go at turning my vintage teacups into candles. I've never tried any form of candlemaking before, and was pleasantly suprised by both the finished result, and how easy it was. I can feel a bit of a Christmas production line coming on.........

To begin with pop a pan of water on the hob to boil, place the wax pellets into a metal mixing bowl (you could also use glass) and place the mixing bowl  over the pan of water.  Once the water had started boiling, I turned it down to a simmer and the heat began working it's magic on the wax pellets in the bowl. Within a few minutes, they go from white, to a clear liquid as they melt.

Whilst the wax melts, cut the wick to the required length, dip one end in the molten wax and push it into the little metal "wick retainer". Hold for a few seconds so the wax sets and the wick should now be held pretty securely within the wick retainer. Put a couple of teaspoons of the molten wax in the base of the teacup and push the wick retainer into it. (mind your fingers as the wax is still hot!) The wick should now be "set" into the base of the teacup.

In preparation for pouring the wax into the teacup, the wick needs to be held straight and upright whilst the wax sets.  To achieve this I wedged the wick between two knives, but tying it around a knitting needle would probably work as well. I guess it depends on how much wick you have left to play with and what you find easiest.

Once the wax is melted and ready to pour into the teacup,  you could add some scent or essential oil to the wax to perfume your finished candle. The kit that I had bought had a little bottle of cinnamon scented essence included.  Perfect for Christmas! But I guess you could add most essential oils, (lavender, ylang ylang, patchouli, citrus to name but a few) and tailor it to whatever occasion, mood or preference you like. It is best to add it JUST before you pour the wax into the teacup (give it a qquick stir), since the perfume evaporates whilst it is in contact with the hot wax.  As soon as it is poured and begins to set, it "locks" the perfume in.

It's probably a good idea at this stage to carefully transfer the molten wax to a jug to make it easier to pour (especially if you're as accident prone as I am!). The kit instructions said to fill 3/4 and allow to set for 30mins, then top up with the rest of the wax.
I'll admit I'm impatient and ended up pouring the whole lot in at once, so my finished candle dipped in the middle a bit, with no wax left over to level it.

Click to enlarge
It's then a question of leaving it to set for 24 hours, and it's ready to light, or wrap up and give as a gift (if you can bear to part with it!) You could glue the cup to the saucer to secure it or keep them as two seperate parts. I can't decide, as it feels wrong to put superglue on something so pretty. Overall, I'm pretty chuffed with my first attempt. My imagination is now running away with me, thinking or all the other things I can stick a wick in and fill with wax.............

http://portialawrie.blogspot.com/
Wednesday, 17 November 2010

Christmas present list


Today I would like to share my list of Christmas presents with you all and see what you say to it. I can't wait to hear your comments. Just in case my family somehow stumble upon this post I won't mention who is getting what.


Can't wait to hear from you.

@EddieDuckling

So behind in posting...and making as well

Hey guys. After my mammoth soap making sessions I now have all those done. A batch each of honey, coffee and oatmeal soap. Now if only I could get on with the rest! I started cutting out the patterns for the stuffed toys I'm making for all the small ones in our lives. I plan on making mice, turtles, teddies and owls. Hopefully these should help me use up a lot of the scraps I've been hoarding :o)

I'm also making messenger bags (from this tutorial) and needle rolls (from this tutorial). I'm knitting a moose for my darling stepdaughter and will be doing it in pink wool to make it a strawberry moose hehehe. I need to make some accessories for my niece, I'm thinking hair and jewellery. In an ideal universe I'll finish the cardigan I'm knitting for my other half but I'm not hopeful. Lastly there is a t-shirt for one of my friends. I plan on stenciling that.

Everyone else is getting cooked goods of some variety. I have 10 jars already done which I will post pics and recipes for shortly. A lot of baked good will be made just before we go and visit so that takes a lot of pressure off me.

There, now I've told you all what I'm doing I must not fall behind :oD

Tuesday, 16 November 2010

Bonjour!...and some advent bunting

Hello everyone, I'm Zoë and I blog over at onerainyafternoon.

Last year I made Christmas presents for nearly everyone I knew which was fun but very, very tiring....! So this year I have cut it down somewhat  a little. But more on that another day as today I am talking advent and, to be more precise, advent bunting.

I saw this in a magazine a couple of years ago and made it up as I went along. In the magazine the photos were styled with fairy lights draped along the top and some sprigs of holly, mistletoe and fir tree sticking out of some of the pockets. Unfortunately my fairy lights are hidden in a box at the back of a very dusty and dirty garage and it is blowing a gale and tipping it down so my intentions of doing a similar styled shoot went to pot (I know, laziness will get me no-where, but waiting to find all of those things, putting it all together and then taking photos will get you no blog post ....)

Anyway, on with the photos


Each square of bunting is actually a little pocket/bag to be filled with goodies!


You, obviously, need 24 little pockets!


I will be back in a few days with home-made ideas on what to put in the pockets. In the meantime, happy crafting and thanks for having me!