Showing posts with label recycle. Show all posts

Friday, 30 December 2011

Round up of Christmas presents

Here is a little look at some homemade Christmas presents. Both the ones I made and gave away and the ones I got. For more inspiration check out my Pinterest board "Making Christmas Gifts 2011" and my blog Eddie's room.


IMG_0047

A bag I made for my husband with embroidered (not by me) birds (he is a big bird fan)

IMG_0036

A tray my husband and I decoupaged with maps for my little brother who is studying geography.

IMG_0150

I made a couple of these porcupine pin cushions for my mother and sister using this wonderful tutorial from Prudent Baby

IMG_0144

I made these Christmas stockings for my husband and myself using this free tutorial.

IMG_0139

My sister made this vinyl record bowl for my husband. There is a free tutorial for this here.

IMG_0146

She also made him this fab pencil case for his art pencils.

IMG_0141

For me she made this pretty shawl which I can't wait to use.

Monday, 12 December 2011

Inspiration and tutorials

I am so excited to be a part of the Crafty Christmas Club again this year. I have already begun making the presents for my family and I just wanted to show you some of the great tutorials I have been inspired by.
First I want to share with you the new Pinterest board that I have setup for this purpose: "Making Christmas Gifts 2011". I am a great fan of Pinterest especially if you can link through and find amazing tutorials.
One of my favorite is the Porcupine Pin Cushion  from Prudent Baby. It was so easy to make and look real nice - just something for the people in my life who love sewing.
Another of my favorites is the 3-way laundry bag by // Between the lines //. Its so easy to make and I have already made 3 for myself (check them out here on Grey Duckling) and 2 for family gifts.
Last year I made decoupaged a bowl with stamps for my husband and this year I have also been decoupaging a couple of gifts for the family (more later).
Finally I want to show you a picture of a couple of decoupaged Christmas decorations I made this year (see last years decorations here).  


IMG_0087 1

During the summer I decided to move more of my personal projects over to my own blog "Eddie's Room". Since I am now 8 months pregnant the latest posts have been about making baby stuff so if you are in need of inspiration for baby gifts you are welcome to have a look over there or on my other new Pinterest board "Creating for baby".

Unless I give birth before then I will be back soon with some pictures of the gifts I have made so far.

Eddie

Monday, 31 October 2011

Upcycling a Wall Calendar into a Monthly Planner

Hey everyone - I'm Karen from Renegade Homestead, checking in again.  In my first post, I listed all the presents I'm planning for my friends and family this Christmas.  Amongst my ideas were several books and journals that I'd like to make instead of buy.  Just one minor set-back:  I've never made a book before.  I decided to do a test run by converting one of the million 2012 calendars that charities send out at this time of year into a hardcover monthly planner.  Here's how I did it:  

Materials:
Wall calendar
Scissors
Glue stick
Corrugated cardboard
Water activated paper packaging tape
Clear packaging tape

1) Start by cutting up a wall calendar into individual pages.


2) Fold each page in half so that the calendar part is on the inside and the picture is on the outside.  Stack them in chronological order.  


3) Glue the back right side of each page to the back left side of the next one.  When you're done you should have something that looks like this:


4) Now it's time to start the cover.  Cut three pieces of cardboard: one for the spine that is 0.5" x 8.75" and two for the covers (each 5.5" x 8.75").  Fold paper packaging tape over the edges to finish them as shown below.


5) Put the three pieces of the cover together to form a triangle (see photo below).  While they're in this position, use a strip of clear packaging tape to connect them.  I centered the strip on the spine and pressed it down on either side.  It's important to do this step in this position to make sure the book opens and closes properly.   


6) Open the covers so that the side with the clear packaging tape is facing down.  Put a strip of paper packaging tape down the center of the spine to connect it again to the covers.  Before activating it with water, I made two creases in the tape where the covers would bend.  You can see the creases on either side of the spine in the photo below.


7) Time to add the pages that were put together earlier.  Glue the back left side of the January page to the front cover.  Open and close the book a few times to see where the back page should sit.  Once you've found a good spot, glue the back right side of the December page to the back cover.


8) I used an extra page that was left over from the wall calendar to pretty up the cover a bit.  Just make sure you glue it on while the book is closed.  


And done!  I'm glad I got this practice run in because I definitely see some room for improvement before I start on the real gifts - especially when it comes to tidying up the cover and improving the spine.  But for now, I'm happy to have saved another wall calendar from the recycling bin!

Friday, 14 October 2011

hello and a snowflake

Hello everyone!  I'm Becca from Knit Happens.  Loving being part of Tilly's lovely Crafty Christmas Club again - so inspiring!  I'm super impressed with how organised everyone is too. 


In an uncharacteristic flurry (sorry!) of seasonal creativity, I had a bash at a Carolina Snowflake from this fab tutorial.  I used double sided sticky tape instead of glue, and was really pleased with how it turned out!  I think these would look equally gorgeous made with sheet music, naff vintagey books or perhaps French newspaper?

Happy crafting all!

Thursday, 16 December 2010

Christmas Aprons - Done!

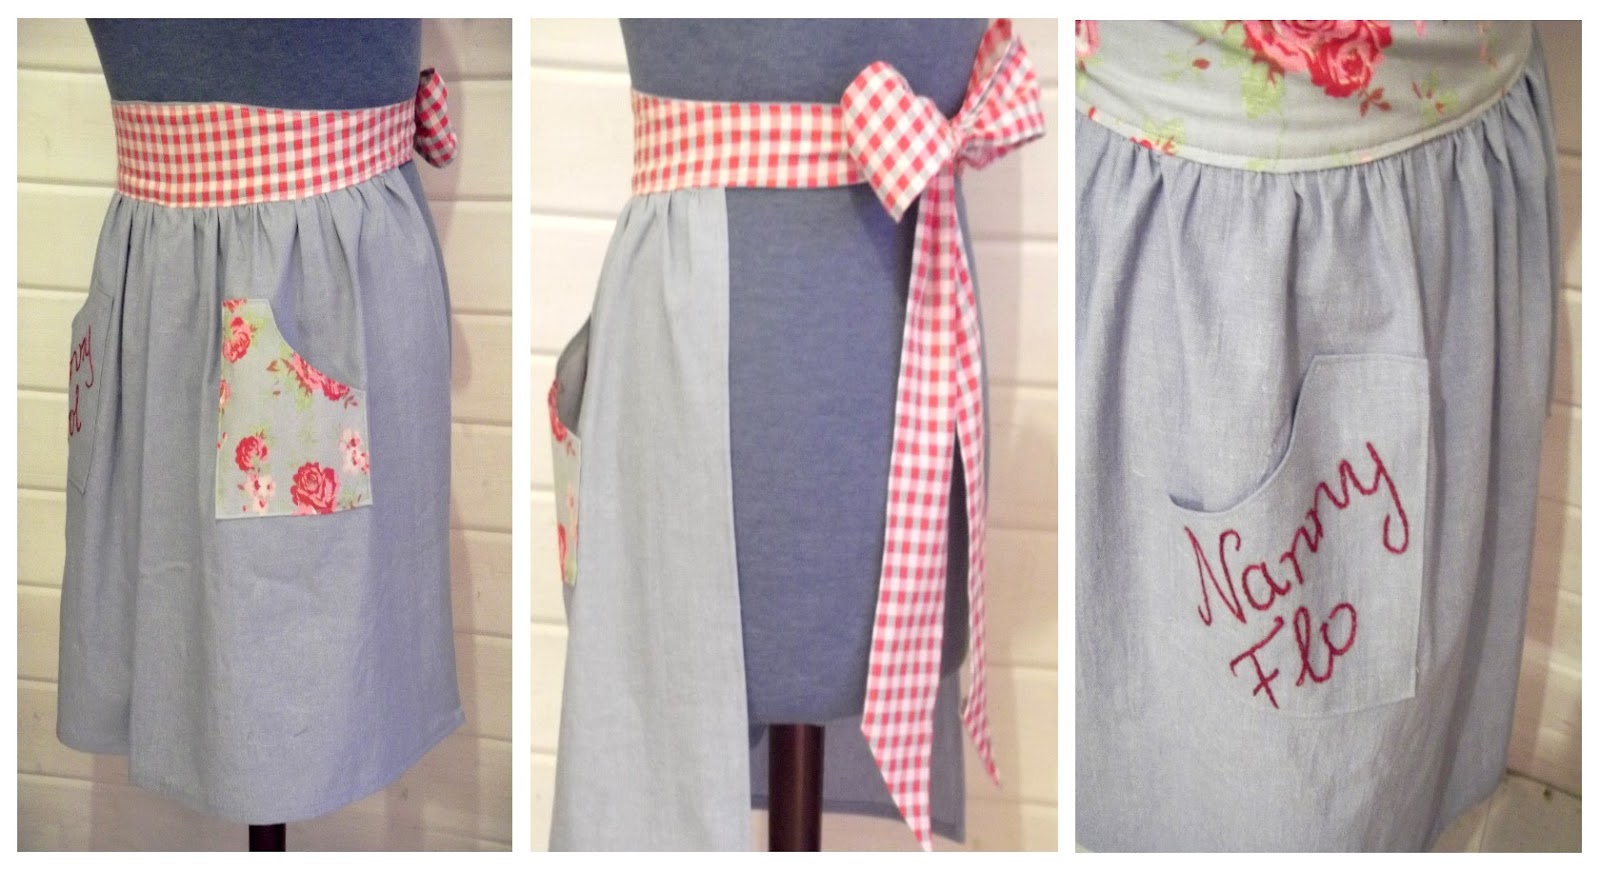
I finished my Christmas Aprons today. (I posted about them here recently) They're little extras for the Little Tornado's Nan and Great Nan.
I adapted the pattern a little and added the embroidery to personalise. My first attempt at these, so hopefully they'll go down well! More about it over on my blog


Happy Christmas and a happy, healthy & prosperous 2011 to Tilly and all at The Crafty Christmas Club.
Miss P xxx

Wednesday, 15 December 2010

Perfect Gifts for Fellow Sewists (inc Tutorial)

Today was my last day at college until the new year. I wanted to give my fellow dressmakers a little something. Some time ago, I'd stumbled upon this tutorial on Martha Stewart's fabulous site, and decided they'd be perfect. And they were. Cute AND quick.


I used some of the fabric left from my Christmas aprons, as it's such a pretty floral. I made up the pincushions as per the tutorial, substituting the "leaves" in Martha's version, for pretty vintage buttons on mine, top and bottom. I secured the buttons with the embroidery floss, wrapping the loose end around the thread shank and tucking it undeneath the button to finish it.

I wrapped them in some polka dot cellophane (from my local florist) tied with a white ribbon. If I do say so myself, they looked soooo cute. All done in one evening, whilst relaxing in front of the TV with a glass of Rioja! Thanks Martha! I rather fancy making a giant one of these for myself.....


Happy Christmas all, With Love & Best Wishes, Portia.xxx (Miss P)

Tuesday, 14 December 2010

Wrap Star


The wrapping has begun. And in true budget fashion too. Brown parcel paper and ribbon has always been my gift wrap of choice, but I thought I'd try something different this time.

I've used free newspapers to wrap, and then strips of lace (old net curtain) and faded raffia (bargain!) to tie. It's pretty, eco-friendly and cost me next to nothing. Even better, I avoided my old nemesis - Sellotape!


Hope this was helpful.
Happy crafting!
Becca

Sunday, 12 December 2010

Christmas Aprons......

Further progress on my Simplicity 2512 will have to be stalled while I knuckle down to sewing up a couple of little cuties for J's Mum & Nan for Christmas. From my stash I've dug out a lovely chambray for the main fabric and a Cath Kidson floral (which began life as a duvet cover!) for the contrast.

The pattern is Butterick, a collection of 1950's style pinnies that I bought about 2 years ago as a beginner project but never used. The final aprons will be a "fusion" of the styles on the envelope. A half apron, with a wide shaped waistband and ties, with 2 patch pockets, one floral and the other cut from the chambray but emroidered with each of their names.

I didn't like the shape of the waistband piece, so did a little re-shaping of my own. It's testament to what a bit of practice and training can do for your sewing confidence. When I bought this pattern I was too scared to even cut it out, let alone start adapting the design and reshaping the pattern pieces. Hopefully finish these tomorrow....

Thursday, 9 December 2010

Super Quick Handmade Gift Tags - Tutorial

I wanted to add a handmade touch to my shop bought wrapping paper,and these are REALLY quick and straight forward to do! I already had everything needed either in my stash, or by making more use of what I had already bought for my wrapping scheme. So not only will they match inperfectly, but they're low cost too.

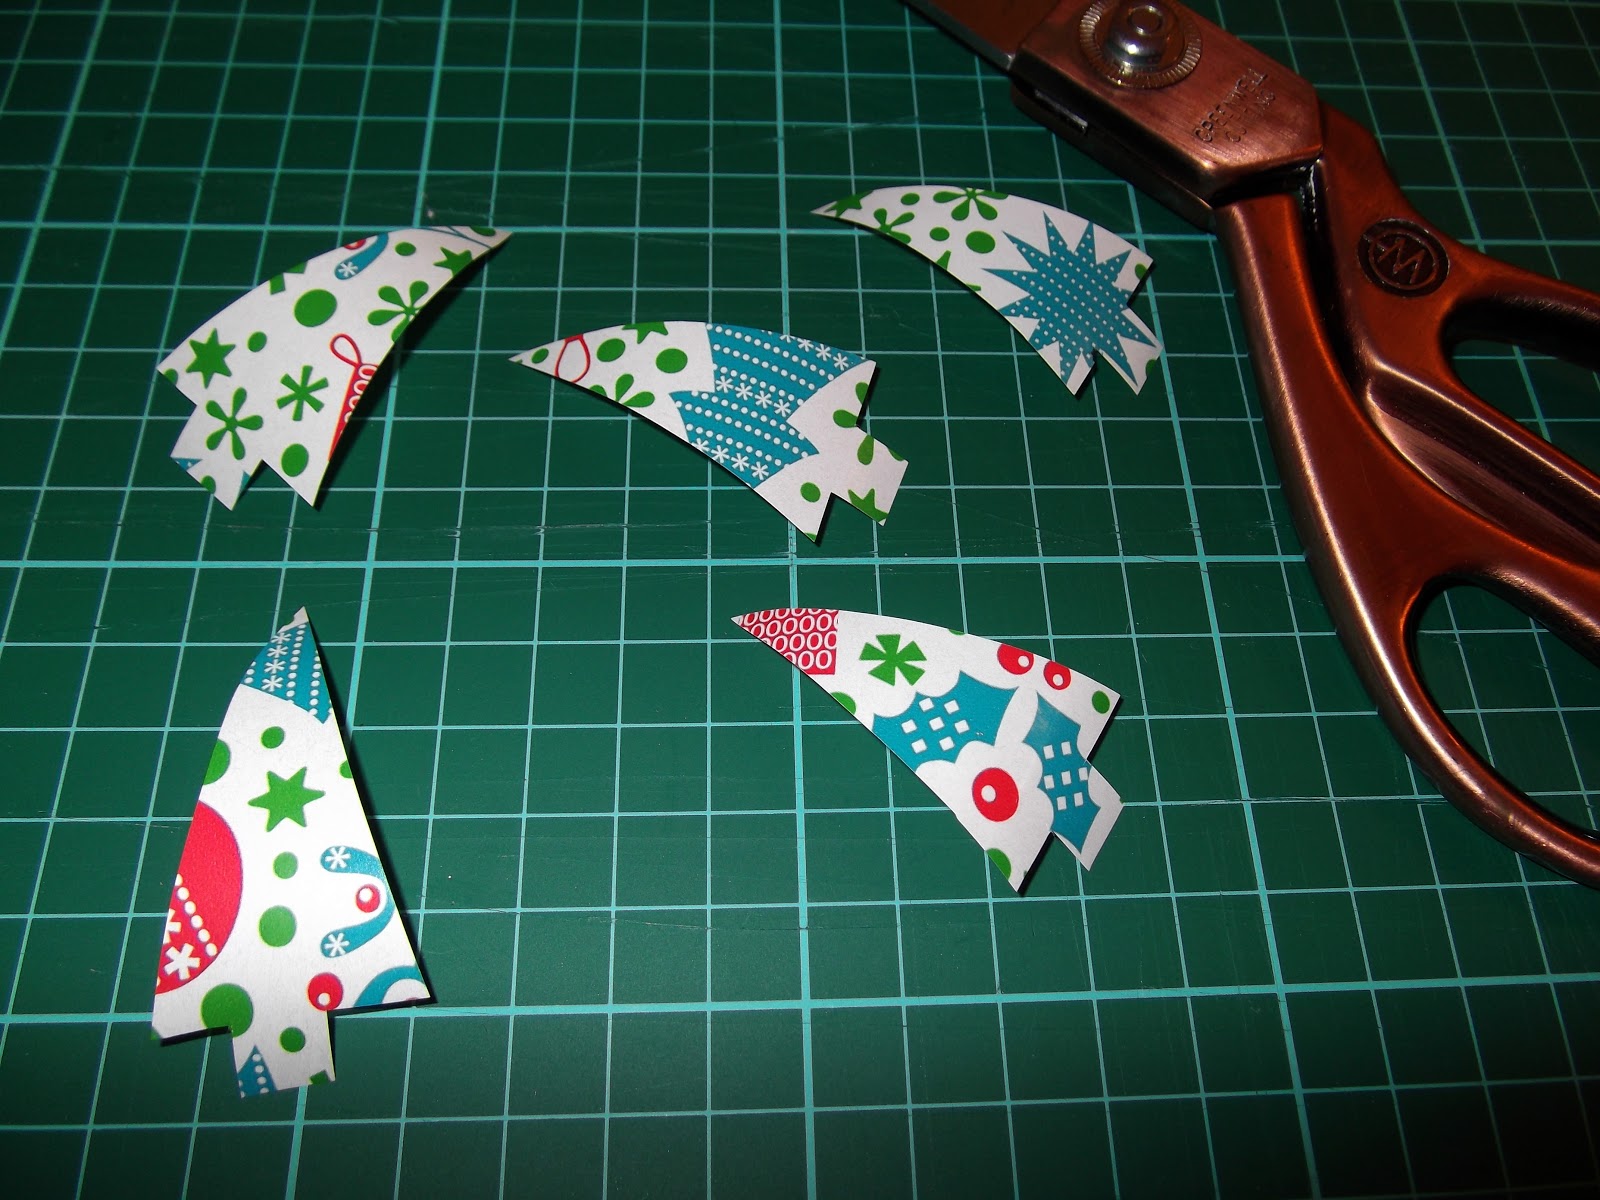
Once you've assembled all your supplies, you could run a dozen of these up in 15 mins (not kidding, that's all it took). They're so so simple to do, and you can vary the materials to give dramatically different looks. You'll need: wrapping paper, pencil, scissors/craft knife, glue/spray mount, tags/card,buttons, ribbon/cord. (/=or)


First step is to cut your wrapping paper shapes . These can be as simple or as complicated as you like. Being a bit of a slave to a theme though, I decided on geometric Christmas trees. I drew the design out on the back first, layered several scraps of paper and cut them all in one go.


Then glue the shapes to your tags or card. You could add other embellishments. Beads, sparklies, glitter, you name it. Whatever tickles your fancy or ties in with your scheme.


Loop ribbon or cord first through the button, then through the tag, then loop the loose ends of the ribbon through itself behind the button and gently pull tight, until the button sits snug against the tag. Et voila! Simple cute and unassuming.

Friday, 3 December 2010

Oh Knickers!

I'll be honest, I attempted to make a pair of knickers from a pattern I had made in tutorial #1. They weren't great.  I thought they were so hateful, they went straight in the bin! The fabric was all wrong, it didn't compliment the lace, and I hadn't thought through what I needed to do before I dived in.

I did stick with it to the end though, and learnt some handy lessons for this attempt! I used different fabric, different lace and all in all I'm happy with my first second attempt. Plus, I can only improve with practice and I definately intend to make more! It's a fun, quick and satisfying project. Once I'd tweaked it a little.....and with the right fabric and lace would make a cute little Christmas gift. Perhaps with a matching camisole..... Tutorial here.....

Wednesday, 1 December 2010

Vintage Teacup Candles

The other day I thought I'd have a go at turning my vintage teacups into candles. I've never tried any form of candlemaking before, and was pleasantly suprised by both the finished result, and how easy it was. I can feel a bit of a Christmas production line coming on.........

To begin with pop a pan of water on the hob to boil, place the wax pellets into a metal mixing bowl (you could also use glass) and place the mixing bowl  over the pan of water.  Once the water had started boiling, I turned it down to a simmer and the heat began working it's magic on the wax pellets in the bowl. Within a few minutes, they go from white, to a clear liquid as they melt.

Whilst the wax melts, cut the wick to the required length, dip one end in the molten wax and push it into the little metal "wick retainer". Hold for a few seconds so the wax sets and the wick should now be held pretty securely within the wick retainer. Put a couple of teaspoons of the molten wax in the base of the teacup and push the wick retainer into it. (mind your fingers as the wax is still hot!) The wick should now be "set" into the base of the teacup.

In preparation for pouring the wax into the teacup, the wick needs to be held straight and upright whilst the wax sets.  To achieve this I wedged the wick between two knives, but tying it around a knitting needle would probably work as well. I guess it depends on how much wick you have left to play with and what you find easiest.

Once the wax is melted and ready to pour into the teacup,  you could add some scent or essential oil to the wax to perfume your finished candle. The kit that I had bought had a little bottle of cinnamon scented essence included.  Perfect for Christmas! But I guess you could add most essential oils, (lavender, ylang ylang, patchouli, citrus to name but a few) and tailor it to whatever occasion, mood or preference you like. It is best to add it JUST before you pour the wax into the teacup (give it a qquick stir), since the perfume evaporates whilst it is in contact with the hot wax.  As soon as it is poured and begins to set, it "locks" the perfume in.

It's probably a good idea at this stage to carefully transfer the molten wax to a jug to make it easier to pour (especially if you're as accident prone as I am!). The kit instructions said to fill 3/4 and allow to set for 30mins, then top up with the rest of the wax.
I'll admit I'm impatient and ended up pouring the whole lot in at once, so my finished candle dipped in the middle a bit, with no wax left over to level it.

Click to enlarge
It's then a question of leaving it to set for 24 hours, and it's ready to light, or wrap up and give as a gift (if you can bear to part with it!) You could glue the cup to the saucer to secure it or keep them as two seperate parts. I can't decide, as it feels wrong to put superglue on something so pretty. Overall, I'm pretty chuffed with my first attempt. My imagination is now running away with me, thinking or all the other things I can stick a wick in and fill with wax.............

http://portialawrie.blogspot.com/
Tuesday, 2 November 2010

Gifts for the Gardener

This Christmas I would like to give gifts that I have made myself. I decided to write some posts about it on my blog Grey Duckling and each has a theme. The theme last week was: Gifts for the Gardener.
For the gardeners in my life I made these nifty recycled spoon garden markers that I think they will enjoy. I have also shared some other ideas and links to tutorials that you might find useful when making homemade gifts for the gardeners in your life. If you have any suggestions of your own I would love to hear them in the comments here, on Grey Duckling or on twitter (@EddieDuckling).
I can tell you now that this week I will be making gifts for the musicians in my life. So keep tuned!

Eddie

Recycled spoon garden markers

This is a simple little tutorial showing you how to make your own beautiful spoon garden markers. You will need a spoon of course. Some paper to cut out and draw on, a pencil, water-colours and an ink-marker to make your design, art fixative to make sure your design isn't ruined when you varnish it and last but not least some varnish to glue the paper to the spoon and cover the design to protect and create a nice finish. As you will see below some of my spoons have been bent. If you decide to do this remember to glue the design onto the spoon upside-down.


Hammered spoon garden markers

Another option when making garden markers is to hammer/stamp your message onto recycled silverware. Below you will find a couple of tutorials showing you how to do this:

Plant Support
Every gardener needs support for their plants. Have a go at building a wigwam from willow or any other material you happen to have.
Gardening Apron
Why not make a lovely gardeners apron. I'm sure it will be appreciated. You get a chance to use left over pieces of fabric to make pockets for the gardener to store seeds and tools.

Do you have more 'making gifts for the gardener' tips to share. Comment below and I will add them to the post.

Do you want to see some more ideas for gifts for the gardener?

Check out my new Pinterest board with ideas.