Showing posts with label garden. Show all posts

Sunday, 26 December 2010

Pressies for the in-laws


Now that Christmas is over I can finally share the last presents with you. I would also like to take this opportunity to invite you all over to Grey Duckling to take part in my first ever giveaway. In the autumn I made a few bobbin lace flower brooches and I am giving one of them away as an extra New Years present to one lucky person. You just have to comment on the post on Grey Duckling to take part in the giveaway.

I hope you all had a great Christmas and I wish you all a crafty New Year.
Eddie


Bunch of knitted flowers for my sister-in-law made using Ingrid's recipe for knitted flowers on Historic Crafts.


Novel bag for my sister-in-law using this tutorial from Grey Duckling that I adapted from the book 'playing with books'!
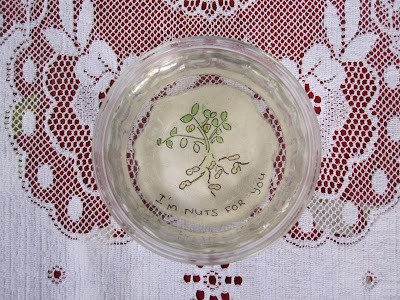

Decoupaged drawing onto the bottom of a bowl for my sister-in-law


Basketweave scarf for my father-in-law using this pattern that I talked about on 'Roued is...'.


Another decoupage bowl!


Mug cozy for my mother-in-law made with the Dixie Norton's pattern on Ravelry.


Garden markers for my mother-in-law. I have posted a tutorial on Grey Duckling on how to make these.
Wednesday, 15 December 2010

Presents for the parents

I gave my parents their presents when they visited this weekend so now I can share them with you all without fear that they might discover and the surprise being ruined.
The Ctr-Alt-Del pillows were for my father. They can go on the sofabed in his office and he can use them when he takes his nap.
I made them out of recycled jumpers and I think they turned out pretty good. He sure seemed to like them.


Another present for my father was this small bowl he can use for a bit of a snack when he is watching a film. I did the drawing myself and glued it to the bottom of the glass bowl from the outside. I then varnished the bottom for a nice finish.


My mother received these recycled spoon garden markers. I have earlier talked about how I made them in this tutorial over on Grey Duckling.


Finally, for my mother too I made this scarf using the very simple but effective basketweaving stitch that I have previously talked about on 'Roued is...' I made one of these for my father for his birthday and when my mother saw it she asked for one too!


Eddie from Grey Duckling

Tuesday, 7 December 2010

Peg Bags!

Hi, I'm Tabatha from Thread Carefully and this year I've made a few people peg bags for Christmas. They are really quick and easy to make, and they're a good thing to give to the person who seems to have everything, or to someone you have no idea what else they might like.

Here's how I made mine. You will need 1/2 metre of fabric, bias binding to match, thread and a child-size hanger (by this I mean a hanger for children's clothing, not a hanger the size of a child!).

Step One - Cut two rectangular pieces of fabric, about 18"x14" (approx. 45cm x 35cm). Place your hanger at the top and draw along its edge. Cut along the line. (Tip: I overlocked the very top edge of each piece of fabric too, because you have to leave a gap for the hanger to go through, and I wanted to finish the raw edge, even though it ends up being tucked in). At the bottom, cut the corners into a curve. You should end up with two identical pieces of fabric looking like this:


Step Two - Take one of the pieces of fabric, and about a third of the way down from the top, draw and then cut the peg bag opening. It should measure at least 7", so that you can get the hanger in at the end.


Step Three - Use the bias binding to bind the raw edges of the fabric at the peg bag opening. I used ribbon because I couldn't find bias binding in a complementary colour, and I didn't have enough fabric to make my own. I pressed my ribbon in half lengthways (as you would also do with bias binding), and stitched it over the raw edges:


Step Four - Lay your front piece and back piece right sides together, and stitch together, remembering to leave a gap at the top where the hanger will go through.


Step Five - Clip the curved edges.


Step Six - Turn inside out, through the peg bag opening. Insert your hanger, and you're done! If you like, you can now add some decorative ric-rac, buttons, embroidery, applique...whatever takes your fancy! The peg bag I've shown here is for my grandfather-in-law, so I'm leaving it plain!

Wednesday, 17 November 2010

Christmas present list


Today I would like to share my list of Christmas presents with you all and see what you say to it. I can't wait to hear your comments. Just in case my family somehow stumble upon this post I won't mention who is getting what.


Can't wait to hear from you.

@EddieDuckling

Tuesday, 2 November 2010

Gifts for the Gardener

This Christmas I would like to give gifts that I have made myself. I decided to write some posts about it on my blog Grey Duckling and each has a theme. The theme last week was: Gifts for the Gardener.
For the gardeners in my life I made these nifty recycled spoon garden markers that I think they will enjoy. I have also shared some other ideas and links to tutorials that you might find useful when making homemade gifts for the gardeners in your life. If you have any suggestions of your own I would love to hear them in the comments here, on Grey Duckling or on twitter (@EddieDuckling).
I can tell you now that this week I will be making gifts for the musicians in my life. So keep tuned!

Eddie

Recycled spoon garden markers

This is a simple little tutorial showing you how to make your own beautiful spoon garden markers. You will need a spoon of course. Some paper to cut out and draw on, a pencil, water-colours and an ink-marker to make your design, art fixative to make sure your design isn't ruined when you varnish it and last but not least some varnish to glue the paper to the spoon and cover the design to protect and create a nice finish. As you will see below some of my spoons have been bent. If you decide to do this remember to glue the design onto the spoon upside-down.


Hammered spoon garden markers

Another option when making garden markers is to hammer/stamp your message onto recycled silverware. Below you will find a couple of tutorials showing you how to do this:

Plant Support
Every gardener needs support for their plants. Have a go at building a wigwam from willow or any other material you happen to have.
Gardening Apron
Why not make a lovely gardeners apron. I'm sure it will be appreciated. You get a chance to use left over pieces of fabric to make pockets for the gardener to store seeds and tools.

Do you have more 'making gifts for the gardener' tips to share. Comment below and I will add them to the post.

Do you want to see some more ideas for gifts for the gardener?

Check out my new Pinterest board with ideas.